Dithering for the Thomson MO5
Some context #
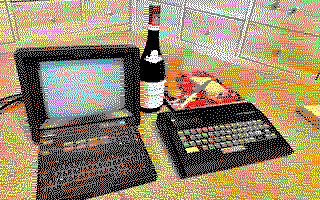
The Thomson MO5 is a French home computer from 1984. If you're not French, you probably never heard of it. That's fine — it was the computer of the "informatique pour tous" 1985 plan. Think like BBC micro, but French.
I didn't use it much back in the day — I was more of an Apple/Tandy kid. But the MO5 is an icon. It's such an icon that the best retro-computing association in France (which I'm part of and you should be too) is literally called MO5.COM.
In the mo5.com Discord group, people were talking about converting and compressing images for the MO5. And color-constrained image conversion is something I really wanted to try someday, so I decided to give it a shot.
The MO5 video capabilities #
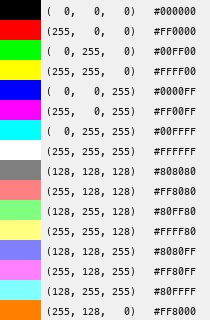
The MO5 has a 320×200 pixel display, which honestly isn't bad for 1984. It has 16 vivid colors:

8 fully saturated colors (black, red, green, yellow, blue, magenta, cyan, white) and 8 "pastel" variants (gray, pink, light green, light yellow, light blue, purple, light cyan, and orange). It's a fixed palette — you can't redefine the colors — but 16 colors at 320×200 is pretty good.
All machines of the era all had limitations like these on high-resolution color modes, because a full 320x200 with 16 colors would require 32K of video memory, and enough bandwidth to read this 60 times a second to refresh the screen.
- The ZX Spectrum gave you 2 colors per 8×8 block — that's a whole 64-pixel square forced into two colors. You had to pick the colors from two separate palettes (bright and pastel). But, with 256x192 pixels, it only took 6192 bytes to store it all.
- The Commodore 64 had similar 8x8 attribute blocks, with two colors, but they could be any of the 16. And the 16 colors were much nicer than the Spectrum. At 320x200 it could fit the whole screen and colors in 9000 bytes.
The MO5's constraint is: every group of 8 horizontal pixels shares exactly 2 colors. That's 2 colors per 8×1 block, not per 8×8. And it works like this natively — no hardware tricks, no scanline interrupts, no "racing the beam." You just write your color byte and your pixels byte and it works. That's pretty neat.
The MO5 has 16 KB of video RAM, split into two 8 KB banks. One bank stores the pixels — one bit per pixel, 8 pixels per byte. The other stores the color attributes — one byte per 8-pixel block.
 Pixel byte:  [1][0][1][1][0][0][1][0]
 Color byte:  foreground = Red, background = Blue

 Screen:      R B R R B B R B
That color byte encodes a foreground color (4 bits) and a background color (4 bits). Wherever there's a 1 bit in the pixel bank, you get the foreground color. Wherever there's a 0, you get the background.
What the C64 can achieve with raster hacks and interrupt handlers, the MO5 just does. In BASIC. No tricks needed. But it's also all you get. No hardware sprites. No palette swapping mid-frame. No tricks up this machine's sleeve. What You See Is All You Get — WYSIAYG, if you will — 2 colors per 8 horizontal pixels, take it or leave it. There are no additional hardware tricks I know of to exploit.
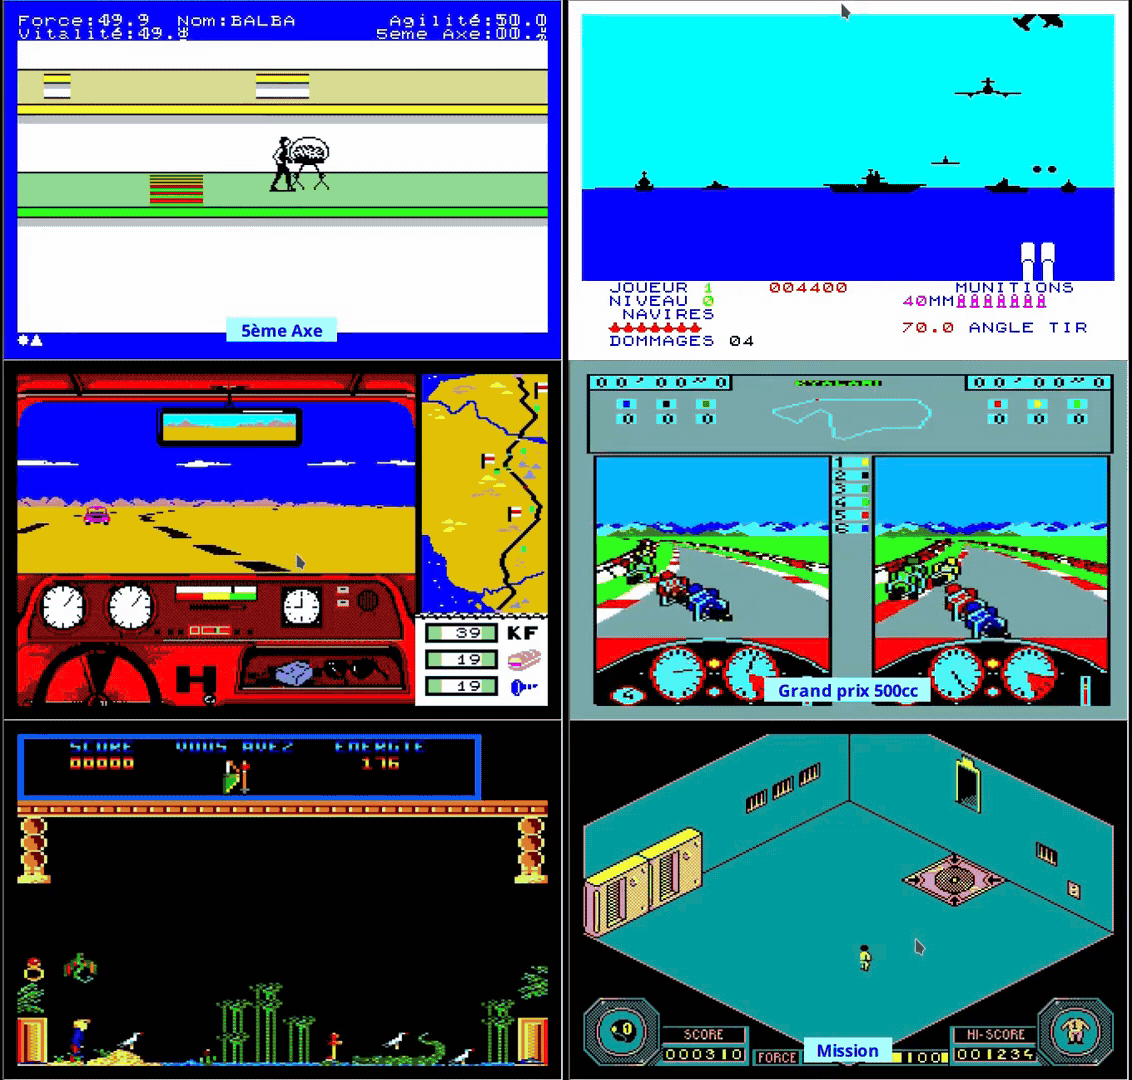
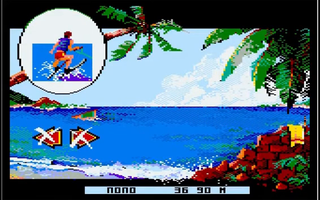
As a result, games from the time looked like this:
Some games managed nice "photographic" images, obviously manually created:
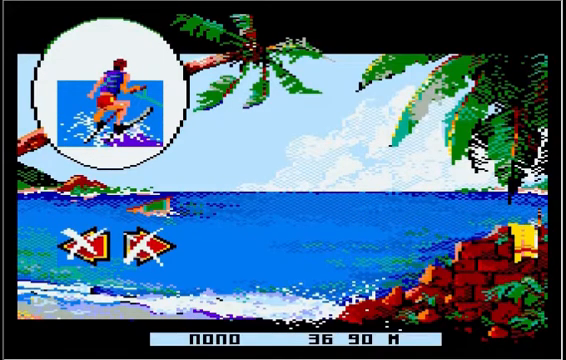
So displaying images is absolutely possible — the hardware is perfectly suited for it. Artists did it by hand, pixel by pixel, for games. The challenge is: what is the best we can do automatically? How can we take an arbitrary modern photograph and convert it to something that looks good?
Designing the algorithm, step-by-step #
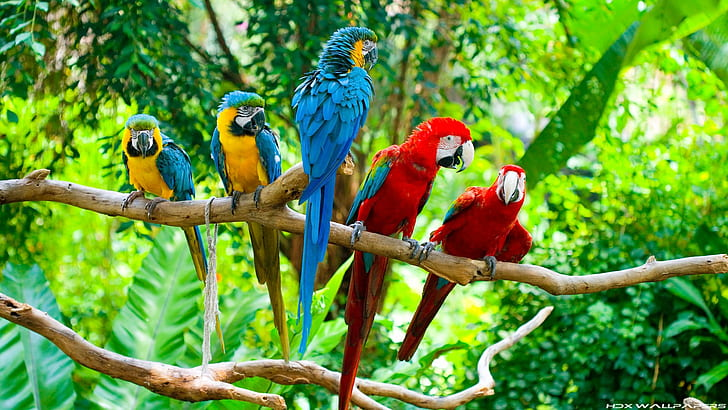
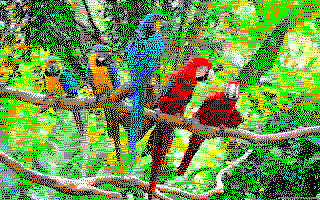
We're going to build the final algorithm in 4 stages. The image we'll be looking at is that colorful image of parrots (sorry Lena, we need something more colorful!):
The naive approach #
The simplest idea: for each 8-pixel block, look at the original colors, find the two palette colors that are the most common, and map each pixel to whichever of those two is closest.
Here is what it does with our favorite parrots:
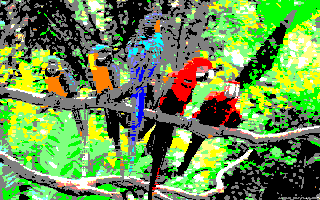
The image is recognizable, but blocky. The reason for that is that there are areas where all 8 pixels maps to the same color. For instance:
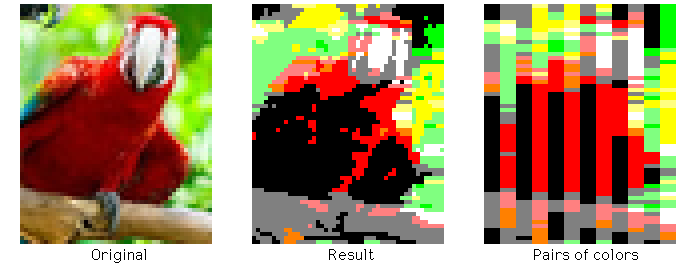
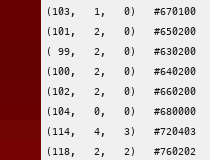
What happened is that the front side of the parrot is dark red, and that the closest color in the palette for this is black. From our human eye, we clearly see the dark red, but truth is that those are the real colors are miuch closer to black...
The MO5 palette is:
So, disappointing, but not surprising. The closest color to very dark red is black.
Of course, we could map to the top 2 best colors, but as each pixel will continue to pick the same one, we need something else...
Dithering to the rescue #
Dithering is the art of lying to the human eye.
The basic idea is that if we can't display the exact color you want, we alternate between two colors that are close. From a distance, our brain averages them out and sees something in between.
There are two broad classes of dithering. One is ordered dithering, which uses a fixed pattern to decide which pixels get which color. The other is error diffusion, which is more dynamic — it looks at the actual pixel values and the errors from previous decisions to make smarter choices.
Having some experience, I decided to skip ordered and directly go to error.
The gold standard for error dithering is Floyd-Steinberg error diffusion. It works like this:
- For each pixel (scanning left to right, top to bottom):
- Pick the closest available color
- Compute the "error" — the difference between what you wanted and what you got
- Spread that error to neighboring pixels that haven't been processed yet
The error gets distributed like this:
              [pixel]  7/16 →
        3/16 ↙  5/16 ↓  1/16 ↘
The pixel to the right gets 7/16 of the error. The three pixels below get the rest. The point is that the error doesn't just vanish — it accumulates and eventually gets "spent" somewhere down the line. If you needed a color that was halfway between red and green, and you picked red, the accumulated error will push the next few pixels toward green. Over a region, the average color ends up being correct, even if no individual pixel is.
If you like more visual explanation, here is a video of the process:
So, what would error diffusion do to our favorite birds?
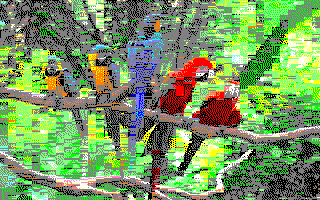
Let's zoom:
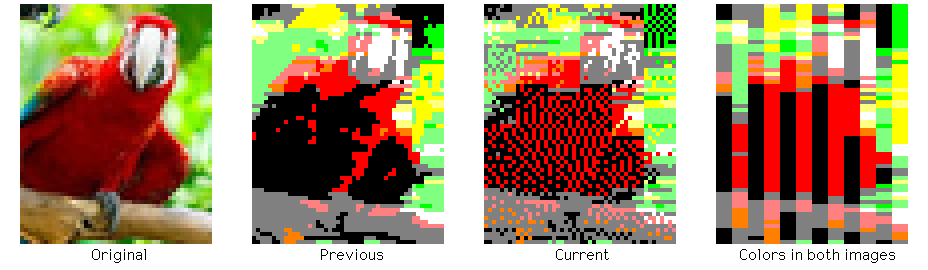
We can see that there are places where it made a difference. For instance, if the color choices were black and red (remember, we choose 2 colors for each 8x1 block), then error diffusion will choose black for the first pixel and push a lot of "we're lacking red" to the next pixel, which will pick red.
However, if we had picked, say, black + yellow for our block colors, we would end up with a completely black band
The easy fix #
We could probably start to work around by making sure we allocate 2 different colors per block, but there is a better idea: we can delay the choice of the two colors until all the diffusion from the previous blocks have been done. This way, if a preceding block has pushed a lot of red, we will be more likely to choose red as one of our two colors. The more information we have, the better is the decision we can take.
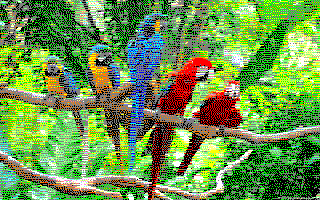
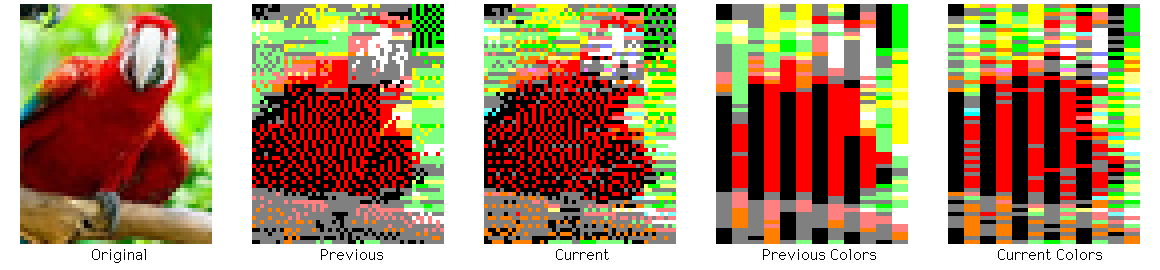
We can see that there are some colors appearing in zones where they were not present. For instance, the little blue pixels on the parrot head are coming from the fact that a lot of the zone on the top-left of the parrot are red and green, and when you approximate grey with red and green, well you get a lot of error in the blue channel. This pushes the algorithm to pick blue as one of the two colors for the next block at some point.
So, this is better, but can we go even further?
The brute force approach #
Obviously, we need to be smarter about picking our two colors for a block.
If we look at our global goal, it is to get the best possible dithering. In many cases it is unclear if dithering with black and red will produce a better result than dithering with black and orange, for instance.
However, there is a measure for that: the total error that gets pushed from the block to the surrounding pixels. Picking the colors that would minimize the error seems like it should produce good results.
After some thinking, I realized that there aren't that many combinations. Since (black,red) is the same as (red,black), we only have (16*17)/2 = 136 combinations to worry about (we could lower that (15x16)/2 = 120 combinations as we can discard pairs of identical colors, because they will never encode better than any pair containing the color).
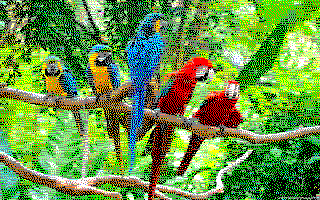
We just try all of those, and pick the one that will generate the least error on the neighboring pixels. We then do the actual dithering, and the produced error will influence the choice of colors on the next blocks. I am not really sure "smarter" is the right adjective here, but it is certainly more informed.
What it means is that when we get to it, the current block has already accumulated the error from the previous blocks. So, for instance, if there is a lot of green missing from the above block, the one lower may choose to use green as one of its two colors and absorb that error.
for each block (8 pixels, including accumulated error):
    best_pair = null
    best_score = infinity

    for each of the 136 color pairs (c1, c2):
        simulate Floyd-Steinberg on the 8 pixels using only c1 and c2
        score = measure how good this looks
        if score < best_score:
            best_pair = (c1, c2)
            best_score = score

    commit best_pair to output
    diffuse remaining error to neighbors
Not that complicated.
136 pairs × 8 pixels per block × 8000 blocks = roughly 8.7 million trial operations. On a modern CPU, this takes around 100ms (in C++. In naive python, it takes 10 seconds).
Let's zoom:
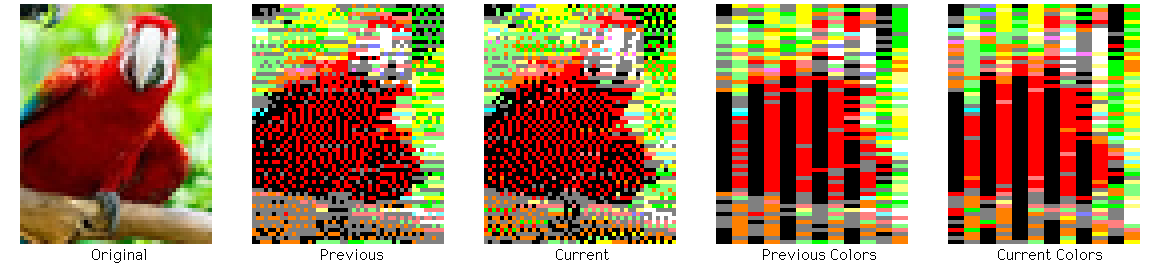
The key changes can be seen on the top right: we now have six orange pixels appearing within the black and green zones, making the overall background green leaf closer to the original. Without this change, that subtle yellow shade in the original would never have been rendered. The branch on which the parrot sits also has many more colors that blend together to create an appropriate render.
We also see that the little blue pixels on the parrot head are now less glaring. With that latest version of the algorithm, some color with some shade of blue can be picked a block sooner, and the shading gets more subtle.
The final algorithm in a splendid manim animation (minus the brute force part):
That's (almost) all folks! #
The C++ command is in png2mo5 GitHub repository
It does a few more things, like having an option to work in CIELAB color space instead of RGB. That often makes the image a bit worse, probably because the MO5 palette is not well distributed, and this whole thing is very RGB centric. I kept it as an option, but the default is RGB.
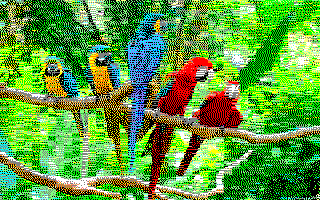
The C++ version also implements damping, which is the idea of sending only a percentage (like 90%) of the error on the basis that the further an error has to propagate, the less it matters. It also alternates the direction in which it propagates the error from left-to-right to right-to-left, on odd and even lines. This removes some diffusion artifacts and help diffuse the error more evenly.
You can have it output two "bin" files, containing the dump of the pixel and color RAM.
There are additional commands:
-
mo5zcompresses the images with zx0 in a way that is optimized for the MO5 and allows a progressive reveal. -
mo5z2pngrevert the above process and re-creates a png from the compressed data files. -
k7toolcan dump and generate k7 files (data for MO5 emulators) -- and was used to create the cassette files for the MO5. -
mo5zviewera simple 6809 assembly program that can load and display the compressed images (at least on an emulator, I haven't tried it on real hardware yet).
The end results looks like:
Bonus: Let's redo a game background #
Remember this screenshot from "Les dieux de la mer"?
Here is what can be done by converting the first google image for "Moorea Beach palm trees":
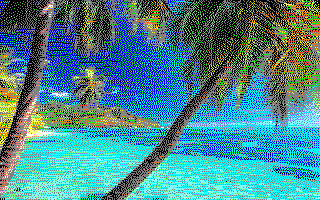
There is definitely room left for making great graphical games on the MO5!