MacFlim

Using Linux to develop on Mac #

This, above, is a screenshot of my linux desktop, when developing MacFlim. While I did spend a lot of time debugging on the real hardware, I spent even more time in that environment.
You can see:
-
On the top left, a custom
minivmacversion, running a disk image, with MacOS, the THINK C compiler, and the source code. -
On the bottom left, Inside Macintosh (in that case, the volume II, on the Sound Manager). There is no way one can develop with the mac without Inside Macintosh. When I was a Mac code, in 1985, I had the "Phone book" version of it (if anyone has one that he would be ready to part with, let me know). I used to sleep with Inside Mac under my pillow. I wish it wasn't true...
-
On the top right, vscode, opened with the source code of
flimmakerthe.flimcreation utility. -
And, on the bottom right, a terminal for compilation and execution of
flimmaker.
This right part of the screen is not the focus of today, we are talking about MacOS player app development (note: I have a blog post on flimmaker in the making for several years...)
About minivmac #
First, the minivmac has been compiled to be exactly a quarter of my screen, using the following options:
./setup_t -m IIx -t lx64 -mem 8M -hres 1280 -vres 768 -speed a -magnify 0 -depth 0 > setup.sh
bash ./setup.sh
make
This way, if I press Control+Shift+F, it takes my full screen, with nice 2x2 square pixels, giving a confortable working environment. Control-Shift-F again, and I am back in Linux.
This is not the standard minivmac, but a custom version I created.
I did that for a few reasons.
-
First, the way the minivmac project is distributed is awful. The build process is ridiculously convoluted. In this codebase, I have a README that I can refer to to build it.
-
Second, I wanted a stable version, and I have no idea, if I pull the source from upstream, what version I will get, and if it will still work in the same way on a few years. I have a version that is "good enough" for me, and I want to pin to this.
-
Last and most important, minivmac does not know how to open disks, only partitions. My understanding is that this comes from the fact that its whole concept of disk is lifted from the floppy driver, and floppies disks are partitions (a fun side effect of that is that you cannot format properly SCSI disk image on minivmac). However, SCSI disks contains several partitions, and that confuses minivmac. I patched it so it recognizes both, and it sortof work, I can drag drop disks on it. At least it is good enough for me (beware, there are hard edges, you have been warned).
The whole setup #
To create the application, I decided that the master of the source code would be in a disk image. This is the "MacFlim Source Code.dsk" in the MacFlim github repository.
It is a 20Mb image, and I commit it into github after each source code modification. This is not pretty, but I found the alternatives to be worse.
In the disk images, there is a System 6.0.8.
The development environment is THINK C 5.0. I wanted the oldest usable development environment, to be sure I would be able to generate binaries for the orignal Mac 128K, running the very early Systems.
So, the code is developped and built on that minivmac environment, using System 6.0.8 and THINK C 5.0.
Disc Setup #
Well, it evolved and accumulated cruft to streamline some other processes, and also, I am not very good at not generating entropy. Anyway:
Disk root #
-
The System Folder. MacsBug is installed.
-
THINK Reference (an online Inside Macintosh replacement) with its database
-
Super ResEdit 2.1.3 (with the CODE disassembler)
-
Stuffit Deluxe, to generate .sit files (which I don't do anymore)
-
A Think C folder
-
A DaynaPORT Installer, coming from various tests of MacFlim in networking environment (this should be removed)
-
Adobe Photoshop 1.0, MacPaint 1.5 and MacWrite 4.6. Those are useful for some local work.
-
TeachText (to create the README file -- which unfortunately is not yet the one that gets shipped :-))
-
HyperCard (to test the XCMD)
-
ImportF1 and ExportF1, two very important utilities that enable someone to move file in and out of the minivmac environment easily.
-
Some random .flim files that should really be removed.
-
And, finally, the "MacFlim Sources" folder.
Note that, during development, I also mount a private 2 Gb partition that contains a mess of flim files to test various ideas.
The 'MacFlim Sources' folder #
One can ignore anything in that folder beside two subfolders:
-
Sources : contain the MacFlim project, source code and resource file
-
MacFlim 2.0 : contains the structure of the "release disk".
Finally, the Sources folder #

This is the master for the sources of the Mac side of MacFlim.
At the top, the 3 main projects:
- "1 - MacFlim.π" is the THINK C project for creating the
MacFlimapplication. Open it, change anything you like, and run the application:

Or generate a new binary to distribute:

Getting the source back in git #
As you may have notices, the source code of the Mac application is accessible from github, in the macsrc directory
This is done so I can easily have access to true source control and diffs, and also so I can create URLs to specific parts of the code.
The extraction of that source code is done by the doit.sh script, in the macsrc directory, using the linux hfsutil command to copyfiles out of the .dsk
And now for the crazy stuff #
Coding for MacFlim is fun, but releasing is very tedious. You need to commit the Source dsk, then manually build apps and XCMD in an emulator and create a .dsk file with all that, making sure the version numbers matches, upload that manually to the github in a new release, with little hope that it is consistent with what is on the website at that time (not talking about the sister website on macflim.com ...). If anything is not to your liking (say a version number is incorrect somewhere), you have to redo that whole error-prone process.
The net result is that, for the last 2 year the binary of the player was not using the same code as the binary for the XCMD. In fact the build was broken, and I was blissfully unaware of it.
So, in the last few months, I sat down to create a proper release management for MacFlim. My goal is to get the full release created on github, without human intervention. That waym if I change anything, anywhere, I can be sure everything will be up to date.
That is not as easy as it looks.
Pain #1, windows #
For years I knew that flimmaker should work on Windows, as it is pretty standard C++, but I wasn't too sure. I am disgusted by windows since the Windows 3.1 time, and had to use it professionally (NT 3.51, NT 4.0 and Win2K). This experience did NOT made me appreciate windows any more.
Anyway, may people are on windows, and it should be possible. I created a github action that created the windows binary, zipped it with all the needed DLLs, so it can be run without any installation. That was surprisingl painless.
[[insert image of Windows flimmaker]]
Pain #2, OSX #
OSX should be vastly easier, as I also have a Mac, and always make sure flimmaker compiles cleanlyon it.
Long story short, I was unable to bundle binaries that a normal user could install, due to the Apple code signing shenanigans. I will not pay $100 a year for the privilege of creating binaries on a computer I own. I used github actions to build the binaries, but the process to enable them to run on a machine is so convoluted and version dependent that it makes no sense to provide binaries.
I switched to homebrew release, which are amazingly easy to do: just had to create a GitHub repository with a specific name, containing a Ruby Formula, and anyone can have flimmaker on OSX, just using: brew install fstark/macflim/flimmaker
However, this formula has to be updated at each new release, as it is pinned to the sha256 of a specific release.
Pain #3, Vintage Mac OS #
That is by far the most difficult part, and I really wanted to automate those releases.
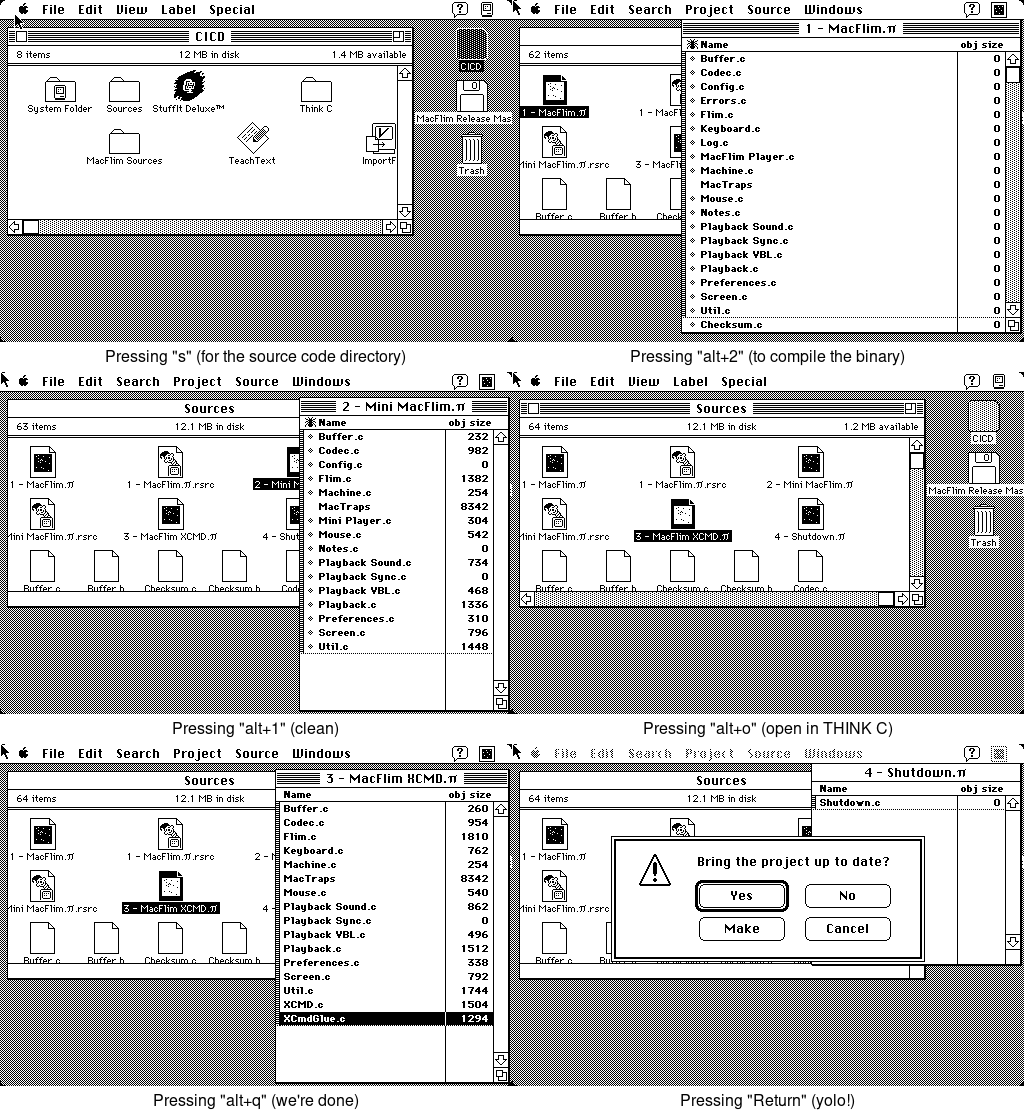
The video shows what the virtual framebuffer gets. Below, you can see what the virtual machine is doing when the build script is interacting with it:
xdotool key)